
Anyone out there with photos of the finished install?
I believe the clutch bleeder goes "somewhere near the starter / bellhousing" and the radiator bleeder probably goes where the passenger side horn is, replacing one of those screws?


Location: Olathe, KS
Posts: 1,678
My VIN: 11596
Anyone out there with photos of the finished install?
I believe the clutch bleeder goes "somewhere near the starter / bellhousing" and the radiator bleeder probably goes where the passenger side horn is, replacing one of those screws?
Andy Lien
VIN 11596 Jan 1982 build - owned since Nov. 2000!
Total frame-off restoration completed 2021-2023
Photography and Backpacking is life.
Was Fargo, ND
Now Kansas City

Location: Northern Michigan
Posts: 1,147
My VIN: 1880
Club(s): (DCO) (DCUK)
I don't have photos, but the radiator bleeder is an in-line bleeder on a hose on the passenger side of the radiator. You cut the hose and install it. EDIT: Photo below from Toby's site:Originally Posted by 82DMC12

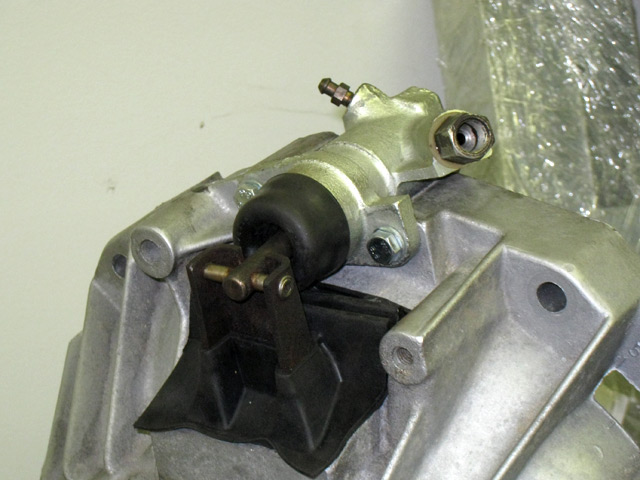
The clutch bleeder replaces the bleed screw on the clutch slave cylinder, which can be seen if you lay on top of your engine and look straight down where the transmission meets the engine.
EDIT: Borrowed photo here of the slave:
Last edited by Patrick C; 12-05-2021 at 10:12 AM.
Patrick C.
VIN 1880
Posts: 1,250
That radiator thing is pretty self explanatory. So what does the remote bleeder consist of? Is it a hard or soft extension on that bleeder?
Location: Olathe, KS
Posts: 1,678
My VIN: 11596
Thanks guys. Actually, Josh responded last night with a couple of great photos. I installed the radiator bleeder today no problem. I disconnected the small hose from the top of the radiator and directed it into a gallon container, and then drained about 2 quarts from the passenger side pipe. Once it stopped, I removed the other end from the small pipe barb and installed the kit as you see in the photo. In my case, I had to drill out the hole in the triangle closing piece a couple sizes up to run the allen screw through. Once everything was tight, I topped up the expansion tank, then started the car with heater on full blast. Once the thermostat opened, I attached a piece of tubing to the bleed nipple (just like a brake bleeder) and directed it into my gallon container. I opened the nipple and once it blew clean coolant out without bubbles, I closed it again and monitored for leaks. No issues. Easy Sunday job.
Probably won't do the clutch until next spring as I'm quite busy at the moment with family in town, the holidays, and a newborn in the house.
261548737_1901854263335893_2224705120440797512_n.jpg
Andy Lien
VIN 11596 Jan 1982 build - owned since Nov. 2000!
Total frame-off restoration completed 2021-2023
Photography and Backpacking is life.
Was Fargo, ND
Now Kansas City

Location: Leonardtown, MD
Posts: 9,006
My VIN: 03572
If that braided hose is touching the cooling pipe, I would put a piece of hose where it contacts to prevent it from wearing. I just use some standard hose which I slit and ty-wrap it on.
Location: Olathe, KS
Posts: 1,678
My VIN: 11596
I'm probably going to do exactly that. It's a millimeter away and is simply a function of how the braided hose turns as you tighten it down.
Andy Lien
VIN 11596 Jan 1982 build - owned since Nov. 2000!
Total frame-off restoration completed 2021-2023
Photography and Backpacking is life.
Was Fargo, ND
Now Kansas City
Location: Thousand Oaks, CA
Posts: 242
My VIN: 16563
Love this, Im in a similar boat in that I had my heater valve break in half as I was driving recently emptying my coolant from everywhere. So I replaced the heater valve and thermostat coz it looked old even though it seemed to be functioning. However now ill run the car and the thermo wont open and I know its coz i have a ton of air in the system. I have the T valve installed down by the front passenger side lower radiator hose. But not sure the best way to approach bleeding. I havent tried with the heat fully blasting, but even with the car hot ill open the bleed valve on the water pump and only steam comes out, no coolant. So something is up and thermo still not opening. Frustrated I cant drive the car.
1983 Delorean-auto, black/gray int. 38k miles
Location: Olathe, KS
Posts: 1,678
My VIN: 11596
What you actually need then is a thermostat bleeder kit. See this photo. It's just a hose that connects the thermostat bleeder to the return on the header tank. It's constantly bleeding off and makes sure there isn't air at the thermostat.
The kit I referred to in the first post is helpful but had nothing to do with the thermostat opening or not.
Sent from my Pixel 3a using Tapatalk
Andy Lien
VIN 11596 Jan 1982 build - owned since Nov. 2000!
Total frame-off restoration completed 2021-2023
Photography and Backpacking is life.
Was Fargo, ND
Now Kansas City
Location: Thousand Oaks, CA
Posts: 242
My VIN: 16563
I can do this but what does it mean that no matter how long I have the bleeder open, its only steam that comes out. I can see the purpose of the hose running back in to the tank for fluid but im seeing no fluid. Thats my main issue it seems
1983 Delorean-auto, black/gray int. 38k miles
Location: Thousand Oaks, CA
Posts: 242
My VIN: 16563
I also never had an issue with my cooling system prior to the dam heater valve breaking in half while driving....
1983 Delorean-auto, black/gray int. 38k miles
 Posting Permissions

 Reply With Quote
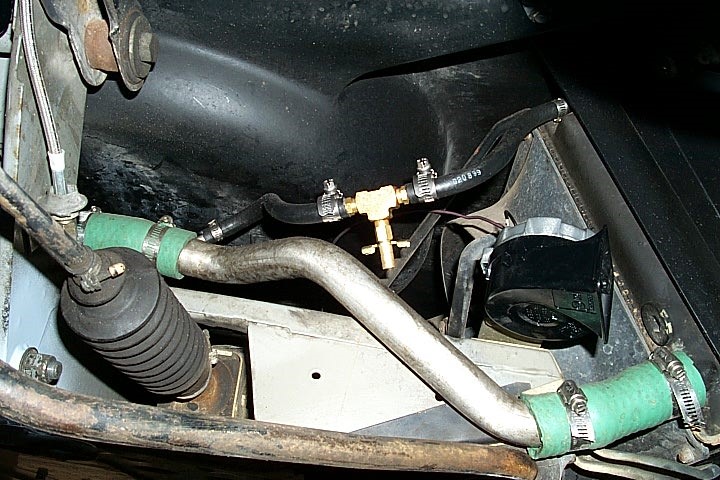
 Dave M vin 03572