FRAMING JOHN DELOREAN - ON VOD www.framingjohndeloreanfilm.com
Page 1 of 3 1 2 3 LastLast
Results 1 to 10 of 22

Thread: 5875 Front end - Before & After

  1. #1
    Senior Member DMCNY's Avatar
    Join Date:  May 2011

    Posts:    133

    My VIN:    5875

    5875 Front end - Before & After

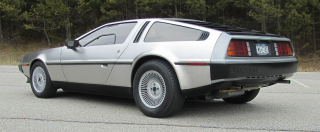
    I've finally finished cleaning up the front end of 5875 to a more presentable condition. It's not perfect or Concours condition, but was in need of some serious attention.

    It has taken over a month of working on it just about every night after work and days off. Just about all front end parts were removed, cleaned, sandblasted or scrubbed, repainted, or re-plated and reassembled.

    Also replaced some hardware with stainless, angle drive, lower speedo cable, torn rack and tie-rod boots, steering column bushing and did a 4-Wheel alignment.

    Here are some before and after pics.

    Thanks for looking.

    (The Before)


    (After)


    Last edited by DMCNY; 11-23-2011 at 08:15 PM.
    Andy Garand


  2. #2
    Certified Stainless!! Chris Burns's Avatar
    Join Date:  May 2011

    Location:  Fernandina Beach Fl

    Posts:    1,928

    My VIN:    Getting closer and closer...

    Club(s):   (DCF)


    Great job!

  3. #3
    Master Fabricator protodelorean's Avatar
    Join Date:  May 2011

    Location:  Woodbine, MD

    Posts:    182

    My VIN:    02650

    Club(s):   (DMA)

    Nice job! They are SO nice to work on when they're clean like that.

  4. #4
    Senior Member Morpheus's Avatar
    Join Date:  May 2011

    Location:  Orlando, FL

    Posts:    1,181

    My VIN:    Former owner of 1098

    Club(s):   (DCF)

    Looks great!
    Brandon S.

    2014 Honda Civic EX
    2007 Volvo S60R


  5. #5
    Junior Member Loach43's Avatar
    Join Date:  Aug 2011

    Location:  Indiana USA

    Posts:    19

    My VIN:    6351

    Many hours well spent. Looks fantastic!

  6. #6
    Guy with a DeLorean Mark D's Avatar
    Join Date:  May 2011

    Location:  Stevens Point,WI

    Posts:    2,471

    My VIN:    6125

    Looks great! I'm in the middle of doing the same type of restoration, and this is some excellent motivation for me to keep pressing forward.

  7. #7
    Senior Member
    Join Date:  Jun 2011

    Posts:    4,808

    My VIN:    3937

    Looks very nice Andy, great job. Out of curiosity, were you considering installing the front end recall kit reinforcement plates?


    Sept. 81, auto, black interior

  8. #8
    Senior Member
    Join Date:  May 2011

    Location:  Las Vegas

    Posts:    750

    My VIN:    6720

    Club(s):   (AZ-D) (LVDG)

    Scrolling through the before pics, I thought to myself, well, it's not that bad, I;ve certainly seen worse. Then I got the the first after picture, and my eyes got wide and I said out loud "Holy Shit". Amazing.

  9. #9
    Senior Member DMCNY's Avatar
    Join Date:  May 2011

    Posts:    133

    My VIN:    5875

    Thanks for all the great comments everyone!


    Quote Originally Posted by Jonathan View Post
    Looks very nice Andy, great job. Out of curiosity, were you considering installing the front end recall kit reinforcement plates?
    Jonathan, I had considered it. I researched the kit as best I could to find out why it was nessesary and exactly what it does. According to the recall, it was based on sway-bar end nuts coming off and ball joint nuts coming off and possibly causing damage.

    Here is more description on the recall.

    http://www.automotix.net/autorepair/.../23609-recall/

    My car is a Oct '81 build. This puts it in or around the time of the recall being reported. 5875 already had the sway-bar end lock nuts installed (double-nutted with original) and upper and lower ball joint castle nuts with cotter pins installed. If this was something that was done by the factory or done by a selling dealer I could not tell, but was done.

    Looking at the side brackets for the recall kit, you can see that it simply has 3 holes for the bracket to mount. 2 are used with the exsisting sway-bar bushing clamps and 1 on the side of the frame used with the exsisting radiator support bracket. IMO this does nothing to strengthen anything and only merly acts as an additional spacer. I could not justify buying the kit.

    I looked the frame over with a fine toothed comb and could not find any areas of cracking or stress points. I also figured the car has made it fine like this for 30 years without a problem so I didn't see the need. Plus the car is mostly just a weekend warrior for me anyway.

    This in no way implies to others that they shouldn't purchace the recall kit or if anyone already has one on thier car that I think they wasted thier time, it's just my opinion. I'm no engineer.

    There are more detailed pictures with descriptions of before and after pics in my albums, too for anyone interested.

    Thanks again!
    Andy Garand


  10. #10
    Senior Member john 05141's Avatar
    Join Date:  Jun 2011

    Location:  Hasselt, Belgium

    Posts:    898

    My VIN:    05141


    Wow!!
    Very nice, I must say. You did an excellent Job.

    John


    Steering with power

Page 1 of 3 1 2 3 LastLast

Posting Permissions

  • You may not post new threads
  • You may not post replies
  • You may not post attachments
  • You may not edit your posts
  •