
I relocated the wiring harness from above the intake to below the metering unit so I could install the new throttle covers.
04212338-41F9-4BDD-ADAD-A64D1C4C6500.jpg


Location: Anchorage, Alaska
Posts: 847
My VIN: 5625
I relocated the wiring harness from above the intake to below the metering unit so I could install the new throttle covers.
04212338-41F9-4BDD-ADAD-A64D1C4C6500.jpg
You can't buy happiness, but you can buy a DeLorean and that's sort of the same thing....
Location: Pittsburgh, PA
Posts: 504
My VIN: Yes.
Club(s): (DCO) (DMA) (DCUK)
I fear I'm going down at least a little of this path. Just trying to reglue a trunk seal right now, and the effort is mainly elbow grease. But there's a bunch of places where the sealant is a mess - I don't know if it's factory or later restoration. But I'm interested to know what tools you found most useful? I've had a little luck with a dremel and wire wheel attachment, but that's not going to work everywhere.Originally Posted by C.Bennett


Location: Leonardtown, MD
Posts: 9,008
My VIN: 03572
I got the 10 hog rings into the head rest bars. I had to use long nose pliers for those. First one took forever but it gets a little easier after the first. This is more work than I thought. I would defiantly find a place that does seat covers and pay to have it done if I had not started. I assume I should stretch the bottom end on first before doing the center "bars".
Location: Pittsburgh, PA
Posts: 504
My VIN: Yes.
Club(s): (DCO) (DMA) (DCUK)
Yeah. That's what I did. It was clearly going to be a ton of effort. Taking the rings off is easy but replacing them wasn't a skill I needed to learn. I paid $125 to have my seat restitched and reattached. Well spent. The only thing I haven't done myself to date.
Sent from my Pixel 3 using Tapatalk
Location: Las Vegas
Posts: 751
My VIN: 6720
Club(s): (AZ-D) (LVDG)
It's a little late for you, but zip-ties would have been your friend for this step.
Thread the zip tie from the back of the head rest bar loop, through the seat skin "tab", and then back/around the head rest bar loop back into the zip tie. Thread all of them in place, then tighten them together, pulling the tab back towards the bar loop. Then continue the rest of the installation with hog rings.
5 speed, grooved hood, grey interior (Nov '81)
QA1 coilovers, Delorean.eu LCA brackets, DPNW Poly swaybar bushings, DMCMW shock tower bar, Deloreana.com convex mirrors, DPNW Toby Tabs, DPI exhaust, C4 Corvette third brake light, PJ Grady tail light boards, Bitsyncmaster relays
Location: Leonardtown, MD
Posts: 9,008
My VIN: 03572
The long nose pliers work pretty good for area that you can't get the larger and shorter hog ring pliers into.

Posts: 4,784
My VIN: Banged your VIN'S mom
Those covers are just what my car needs.

Location: Holly Springs, North Carolina
Posts: 17
My VIN: 16677
Just put in the rear LED lights and a new rear harness!
Trying to figure out how to do the sidelights now and I want to change my headlights to LEDs but not sure what to buy...
Proud Owner of 16677
Twitter: @limitedrundoug
Location: Tacoma, Wa
Posts: 2,208
My VIN: 4877
Club(s): (PNDC)
I got my headlights on amazon
The LED's...
https://www.amazon.com/gp/product/B0...?ie=UTF8&psc=1
The Housings with halos
https://www.amazon.com/gp/product/B0...?ie=UTF8&psc=1
Toby at Delorean NW also sells an LED replacement set.
Rob Depew
Tacoma, Wa
'81 DeLorean 4877 Grey, Auto, 4 wheels
The Ressurection of 4877......
Website
YouTube
My Patreon

Location: Bay Area, CA
Posts: 202
Club(s): (NCDMC) (DCUK)
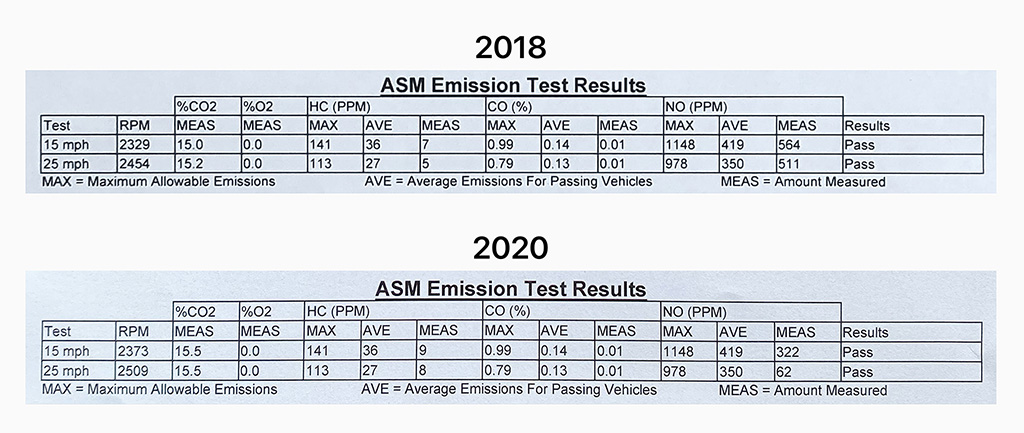
Ah, "California" and "SMOG". Two dreaded words depending on where you live in America.
My last ever smog test is done. The anxiety attack is over forever as my car will be traveling with me to Scotland next year, where the car will be exempt from MOTs from the end of 2021.
Great to go out with some solid numbers. "NO" being a huge improvement from 2018. Might be my new injectors and properly adjusted Dwell. Who knows. Either way, I'll take it.
Happy days…
DeLorean DMC-12 (October 1981)
Manual transmission. Grooved hood. Grey interior. Rear antenna.
Obsessive perfectionist and 64th annual 2019 Hillsborough Concours D'Elegance class winner.
 Posting Permissions

 Reply With Quote
 Dave M vin 03572
