Keep up the good work, Jim! I'm excited to see the finished product.


Location: Orlando, FL
Posts: 1,181
My VIN: Former owner of 1098
Club(s): (DCF)

Keep up the good work, Jim! I'm excited to see the finished product.
Brandon S.
2014 Honda Civic EX
2007 Volvo S60R

Location: Queens, NY
Posts: 1,307
My VIN: 2964
It's been 6 months, just curious what you been up to with this? Hopefully some good progress.Originally Posted by dmc6960

Billy C. VIN: 2964
"Trying to Live the Dream!"
"If you're gonna own a DeLorean, why not build it with some style?"
http://www.facebook.com/billy.chingas.7

Location: Minnesota
Posts: 1,591
My VIN: 06960
Yep. I had several rounds last year with some really good momentum going. Then over winter, which was supposed to be the "kick-ass" time, everything stopped as I got loaded down with a second job. I really want something GOOD to show people for all the effort I've put into this so far, and I keep interested in it instead of one of those pipe dreams that always seem to fizzle. A benefit on my end is already the ~$300 I've invested in tools and parts so far. Eventually to be a lot more. I've set an ambitious personal goal of having something really good to show at the DMCMW open house next month.
Billy, if your selling your instrument cluster in anticipation of purchasing one of these units, I'd suggest you wait until they are actually available. It'll still be at least a year until I have anything complete.
Jim Reeve
DMC6960
Location: Queens, NY
Posts: 1,307
My VIN: 2964
I had already bought from DMCH a NOS a while ago. Just trying to sell my old one.
Billy C. VIN: 2964
"Trying to Live the Dream!"
"If you're gonna own a DeLorean, why not build it with some style?"
http://www.facebook.com/billy.chingas.7
Location: Minnesota
Posts: 1,591
My VIN: 06960
Finally some more progress...
While I haven't really had any additional free time, I've been squeezing in work during the evenings instead of going to sleep.
At this point, I'm back into the program coding. Where I last left off, I was using a potentiometer to adjust the micro's analog input. This gave a really "rough" approximation of an analog sensor. I was able to get the stepper motor to go up and down, approximately the same amount I was turning the POT. The stepper motor was also being controlled in really rough increments, 2º at a time, for each change in the input. There was also no filtering on the input line leading to a LOT of jitter in the results.
See this video for that action... https://www.youtube.com/watch?v=zJrdOb3aZkc
Shortly before the DMCMW open house... Ok, literally the night before; I assembled an analog input circuit to allow me to attach a fuel level sender to a new breadboard I was using to demo. Hooking this up without any modifications to my previous code produced results less than exciting. This was due to an improper resistor rated much too high. It left me with about 6-8 units of resolution, instead of 256-1024. I did show a few people this during the open house. I would hold the sender unit one way, and the pointer would show it, flipped it over to move the float to the other end, and the pointer moved ~90º the other way. Due to the existing jitter and very low resolution, it was difficult to show people half-way or any kind of fluid movement.
Now that I've had a week at home, I've made some massive progress. I started out by getting the input circuit correct so I would have nearly full-resolution on the analog input. Next I implemented a running filter to nearly eliminate all jitter. And finally I've had success at moving the pointer at the smallest resolution its capable of, 1/3º. UNFORTUNATELY it seems handling a fuel level sender like a shake-weight is counterproductive to its lifespan. It is now broken. To make matters worse, this generic VDO-built unit for 1983-1987 Saab 900's*** is no longer available. I THINK I have one ordered from a parts house that still has one in stock, but we'll see.
***For those who dont know... This fuel sender from the Saab is the unit used for TankZilla. It has the same physical dimensions as the OEM fuel sender. It is made out of aluminum and steel instead of plastic. Unfortunately for DeLorean-owners it reads the resistance in reverse from a DeLorean unit. This makes it worthless as a drop-in replacement. The TankZilla unit used a logic-box to transpose the readings to properly send it to the DeLorean gauge. Of course, this is all a non-issue for a programmable micro-controller.
Since the fuel sender is by far the easiest to work with while sitting on the couch, table, or bed, its what I've been doing all my initial work with. Next up in the program, is to incorporate acceleration into the pointer. Right now, its always moving at a constant speed with instant stop. This can result in the pointer loosing its accuracy if it skips any steps while reversing. The acceleration logic will prevent this from happening, and give the pointer a very fluid appearance. After that is complete, I will expand the program to run two gauges at once, which is currently the plan for the 4 smaller gauges. Once that is working properly, I will setup a temporary oil-pressure and fuel-level gauge in my car. These work well for testing, because they use approximately the same resistance range, are in the same "gauge pod", and are also the most dynamic of the 4 small gauges. While I'm driving around in the daytime testing these, I will expand my programming into the tachometer, then the speedometer during the evenings.
Unfortunately the fuel sender died before I could make a fancy movie of me using it like a shake-weight. But here is a picture of me doing some tests on an OEM temp sensor. Surprisingly, my wife was not upset about using the kitchen tools.
testingtempsensor.jpg
Jim Reeve
DMC6960
Location: Sunfield, Michigan, USA
Posts: 2,444
My VIN: 1798
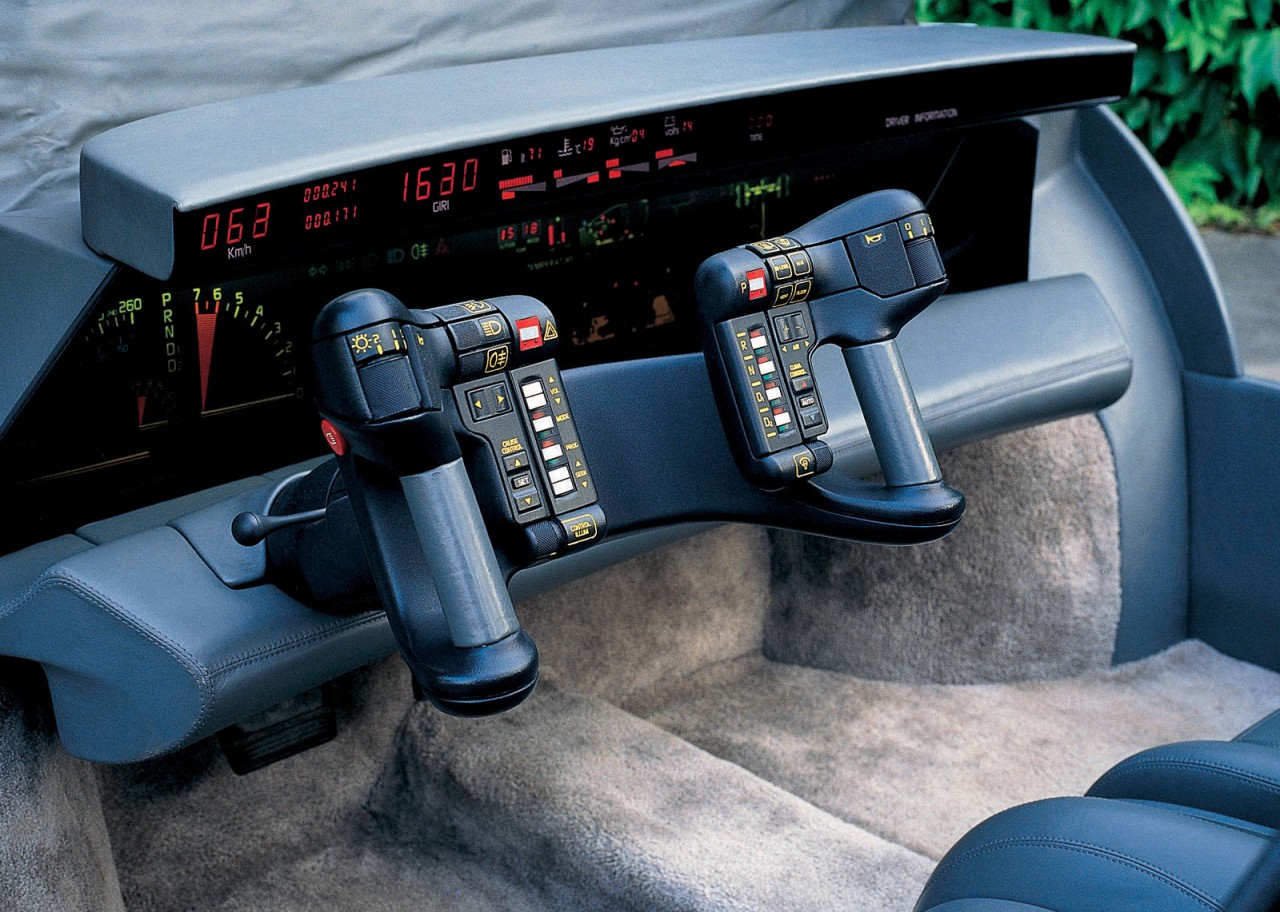
I'm hoping that when Jim is done with this project, it looks a little something like this:
We just have to get Jim to work on redesigning the steering wheel with the integrated stalks and controls

Location: Sacramento-ish
Posts: 4,408
My VIN: 02100
Club(s): (NCDMC) (DCUK)
OK, I gotta ask... what's that from?! I love it.
Jon
1981 DMC-12 #02100. July 1981. 5-speed, black, grooved w/flap.
restoration log, March 2011 to present
full and detailed photo restoration log

Location: Maple Grove, MN (Minneapolis)
Posts: 1,432
My VIN: 05457
The image file name says it is a 1986 Italdesign Oldsmobile Incas interior. Found some more photos here: http://www.carstyling.ru/en/car/1986_oldsmobile_incas/
David Proehl
Location: Sacramento-ish
Posts: 4,408
My VIN: 02100
Club(s): (NCDMC) (DCUK)
Show-off....
Thanks
Jon
1981 DMC-12 #02100. July 1981. 5-speed, black, grooved w/flap.
restoration log, March 2011 to present
full and detailed photo restoration log
Location: Minnesota
Posts: 1,591
My VIN: 06960
Apparently you guys forgot about one of my requirements...
Maintain original appearance.
Though that does look pretty neat.
Jim Reeve
DMC6960
 Posting Permissions

 Reply With Quote